Why Brow Lamination at Home Is TrendingBusy beauty lovers want fuller brows without adding extra salon appointments to their weekly schedule.
Brow lamination at home has become one of the most searched beauty routines for people who want polished, fluffy brows with minimal effort. The treatment helps shape brow hairs upward and outward, creating a fuller appearance that lasts longer than standard styling products.
For busy mornings, an at-home brow routine can save time while still giving brows a clean, lifted finish. Many people also love the flexibility of customizing their own brow shape without needing frequent salon visits.
Whether you are experimenting with a brow lamination diy routine or trying a soap brows tutorial for the first time, the goal is simple: natural-looking brows that stay in place all day.
What Makes Fluffy Brows So PopularSoft texture and lifted brow hairs create a modern makeup look that appears effortless and fresh.
Fluffy brows work with minimal makeup, making them ideal for everyday wear. The brushed-up effect frames the eyes while keeping the overall appearance soft instead of overly sculpted.
Another reason fluffy brows continue trending is versatility. They pair well with natural makeup, glam looks, and even no-makeup beauty routines. A simple brow lamination diy process can instantly make sparse brows appear thicker.
Well-shaped brows can completely change the balance and definition of your face.
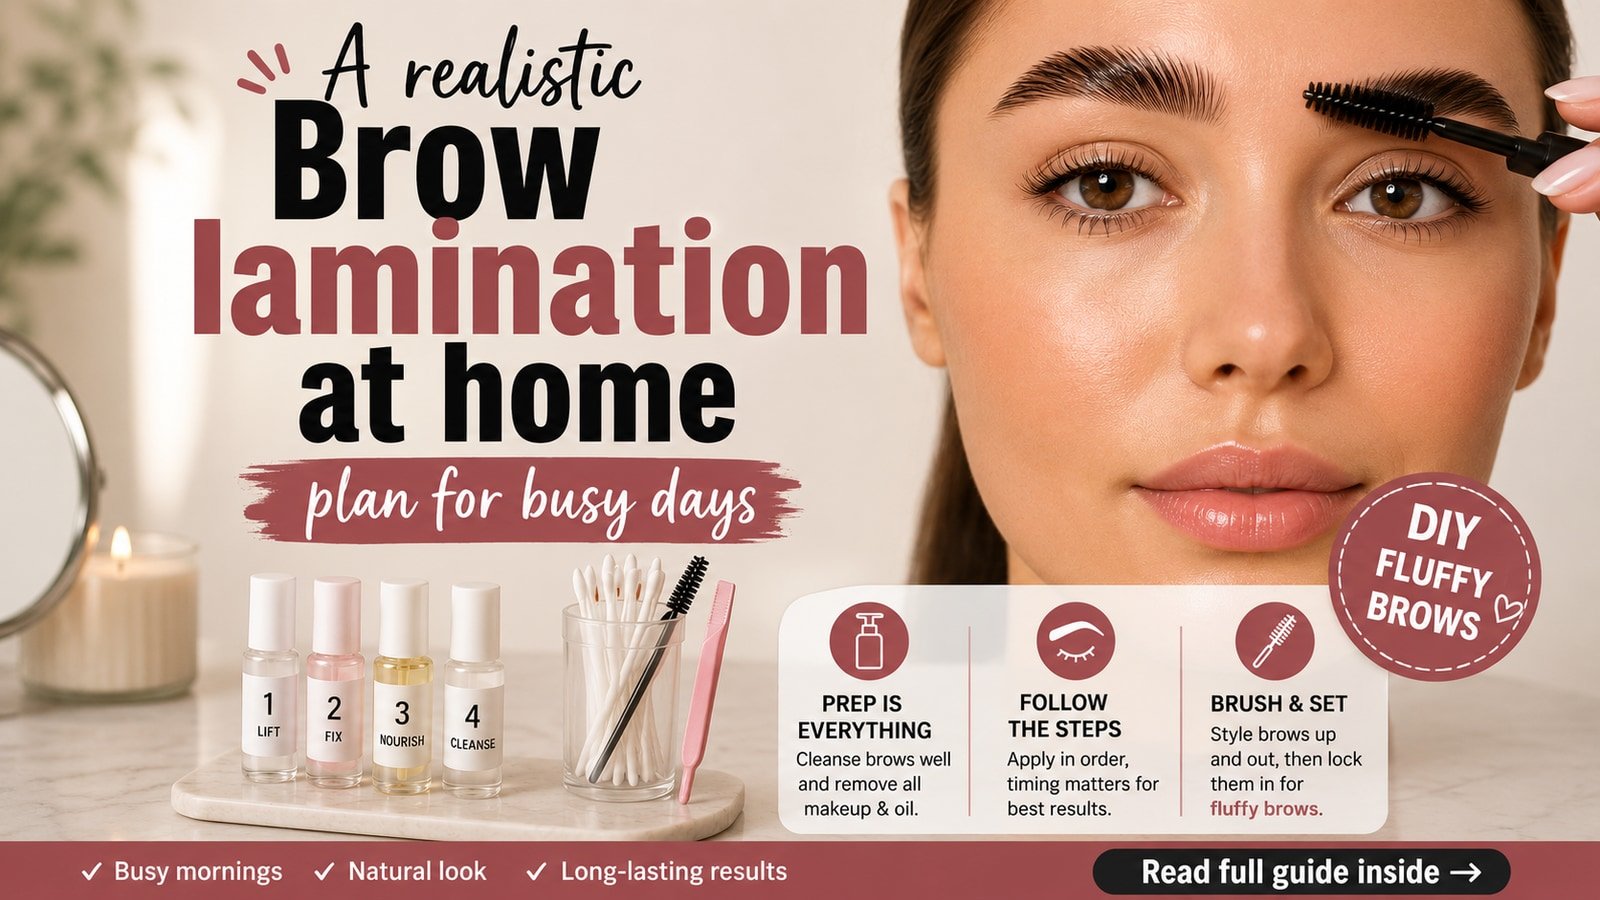
Essential Tools for Brow Lamination DIYPreparing the correct products beforehand makes the process safer, cleaner, and easier to control.
Before starting your brow lamination at home routine, gather all products in one clean workspace. Having everything ready reduces stress and helps you follow timing instructions more carefully.
- Brow cleansing solution
- Lifting and setting lotions
- Spoolie brush
- Cotton swabs
- Brow-safe adhesive
- Nourishing brow oil
Many people also combine their routine with a light soap brows tutorial afterward to maintain extra hold throughout the day.
A Realistic Brow Lamination at Home Plan for Busy DaysThis step-by-step routine keeps the process manageable even during hectic mornings or packed evenings.
- Start with clean brows
Wash away makeup, sunscreen, and excess oil before beginning. Clean brows help the lifting solution work more evenly and reduce the risk of patchy results during your brow lamination at home routine.
- Brush hairs upward gently
Use a spoolie to shape brow hairs upward and outward. This step helps you visualize your final fluffy brows shape before applying any products or setting solutions.
- Apply lifting solution carefully
Spread a thin, even layer of lifting lotion across the brow hairs while avoiding direct skin saturation. Follow the timing instructions included in your kit to prevent overprocessing.
- Cover brows while processing
Place a small strip of plastic wrap over each brow to lock in moisture and improve consistency. This technique can help the brow hairs soften more evenly.
- Remove product gently
Use a dry cotton swab to carefully wipe away the lifting solution without rubbing aggressively. Rough removal can disrupt the shape you created during the brushing stage.
- Shape brows into place
Brush your brows into the exact style you want before applying the setting lotion. Focus on symmetry while keeping the look soft and natural instead of overly stiff.
- Apply the setting solution
The setting lotion locks the brow hairs into their new direction. Follow timing instructions closely because leaving the product on too long may dry out the brow hairs.
- Clean away remaining residue
Once processing is complete, gently cleanse the area using a damp cotton pad. Removing leftover product helps prevent buildup and keeps brows looking polished and healthy.
- Add nourishing brow oil
Hydrating the brows after lamination helps maintain softness and shine. Conditioning oils are especially useful if you regularly perform brow lamination diy treatments at home.
- Style with a spoolie
Brush brows upward once more to refine the final shape. This is the moment when fluffy brows become more defined and naturally lifted.
- Use soap brows technique
A lightweight soap brows tutorial method can add extra hold for long days. Use only a small amount of product to avoid white residue or stiffness.
- Avoid water for one day
Keep brows dry for at least twenty-four hours after treatment. Excess moisture immediately after lamination may weaken the results and shorten the lifespan of your styling.
Common Brow Lamination Mistakes to AvoidSmall application errors can affect texture, symmetry, and the overall finish of your brows.
One of the biggest mistakes during brow lamination at home is leaving products on longer than instructed. Overprocessing can make brow hairs brittle and difficult to style later.
Another common issue is using too much adhesive or soap product. Heavy application can make fluffy brows appear stiff instead of soft and airy.
Finally, avoid skipping aftercare. Conditioning products help maintain healthy brows and support longer-lasting results between treatments.
How to Make Brow Lamination Last LongerSimple aftercare habits help maintain shape, softness, and healthy-looking brow texture for several weeks.
Use gentle skincare products around the brow area and avoid harsh exfoliants immediately after treatment. Excessive rubbing or strong cleansers may weaken the laminated shape more quickly.
Applying a nourishing brow serum several nights each week can also keep hairs smooth and flexible. Consistent hydration supports better styling results over time.
For daily maintenance, lightly brush brows upward every morning to refresh the fluffy effect without needing extra makeup.
Final Thoughts on Brow Lamination at HomeA simple routine can deliver polished brows while fitting naturally into a busy beauty schedule.
Brow lamination at home offers a practical way to achieve fuller, lifted brows without constant salon visits. With the right products, careful timing, and a consistent aftercare routine, you can create soft fluffy brows that look professionally styled.
If you want more brow lamination diy ideas, styling tricks, and a complete soap brows tutorial, explore the full guide and build a routine that works for your everyday schedule.
Comments
Thoughtful discussion — moderated before publishing.
Start the thread — your note appears after a quick review.